...I was about to write "and a bottle of rum", but I changed my mind. After all, it is Monday.
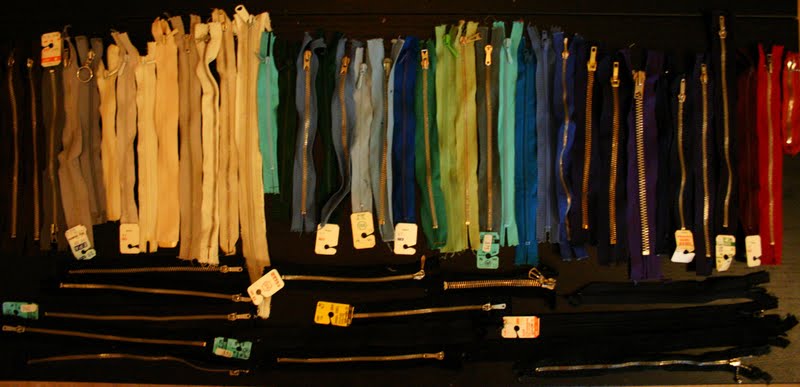
What I intend to mention though, is my latest online auction find, of 54 vintage zippers. I paid 135SEK for them, including postal fees, so I got them for 2,50 each! (Not even half a dollar!) I believe these will keep me stashed for quite a while! Yay!
If anyone is crazy enough to count the zippers in the picture, they might notice that there are only 53, that would be because a brown one on the left decided to escape the table! ;)
Monday, September 5, 2011
Sunday, September 4, 2011
The "When life gives you lemons" dress
So, being a bit worn out from sewing that plaid suit earlier this week but still wanting to make something, I decided to dive into a super simple project that I wouldn't mind if I messed up. So here goes that fabric I didn't know whether to love or hate that I got in the pig-in-a-poke bag of fabrics a while back... And a pattern that failed me miserably last time (or, well, I did manage to fix the problem fairly well, but still decided that the pattern was evil!). Therefore: When life gives you lemons dress.
Here's the pattern:
Swedish pattern Vi-mönster no. 2196, dated 1960. Last time, despite having cut the size 40 (that is like a US size 12) the neck and armholes were ridiculously tiny. Last time I just added more fabric to the shoulders because everything was already cut, now I wanted at real solution. I managed to slice and spread the pattern so it worked this time! If anyone is interested I can make a tutorial on how to make this kind of change!
And here's the fabric... Oh yes, it's a purple-white-lime green striped heavy jersey.
Imagine my happy surprise when I realized it actually came out like something I might wear. In public! It might look a bit jailbird without the belt (and especially in this horrible evening indoor light, the flash kills everything!), but with a belt, cute shoes and some more styling I think I might be able to make it work! Oh and also - it took me about two hours from taking out the pattern to wearing the dress! That was some well used time! Apparently, when life gives you lemons, you might still end up with a cute (but crazy) dress!
This belt didn't look mismatched in real light... Both belt and shoes are real vintage and comes from my mom! I am so lucky she has saved some things from her 60s-70s wardrobe that are still usable! Things were really better quality back then...
Here's the pattern:
Swedish pattern Vi-mönster no. 2196, dated 1960. Last time, despite having cut the size 40 (that is like a US size 12) the neck and armholes were ridiculously tiny. Last time I just added more fabric to the shoulders because everything was already cut, now I wanted at real solution. I managed to slice and spread the pattern so it worked this time! If anyone is interested I can make a tutorial on how to make this kind of change!
And here's the fabric... Oh yes, it's a purple-white-lime green striped heavy jersey.
Imagine my happy surprise when I realized it actually came out like something I might wear. In public! It might look a bit jailbird without the belt (and especially in this horrible evening indoor light, the flash kills everything!), but with a belt, cute shoes and some more styling I think I might be able to make it work! Oh and also - it took me about two hours from taking out the pattern to wearing the dress! That was some well used time! Apparently, when life gives you lemons, you might still end up with a cute (but crazy) dress!
This belt didn't look mismatched in real light... Both belt and shoes are real vintage and comes from my mom! I am so lucky she has saved some things from her 60s-70s wardrobe that are still usable! Things were really better quality back then...
Thursday, September 1, 2011
Finished: The Plaid Suit (YAY!)
I am so happy! I did it! The suit is finished, and I had perfect buttons in my stash already and... boy am I glad this is over, lol. And oh it will be some time until I make something this complicated again...
Here it is:
Yes, it needs ironing... I don't have an iron at the moment so all the folds and hems are a bit more fluffy than they should. Oh well.
Here are some where you can see the skirt a bit better. I used almost every little scrap of the plaid fabric, luckily, it was just enough for the waistband and the bit at the bottom. I think one good thing about having it like this is that the placement of the darker fabric makes it very slimming! The white shirt is an old rtw, I have no idea when or where I bought it (but most likely it was second hand...).
A few details, the lining, the bias cut pockets, the facing, the lovely brassy buttons with little anchors on them (I just lovelovelove them!!), and the green lining in the waistband which was also just a small scrap! Nothing gets wasted around here. :D
Now for some construction pictures...
You know you're in for a rough one when the pattern paper looks like the one above... The past weekend I remembered that I have this book called Mode Klassiker, it's a pattern book specialized on jackets, skirts and trousers... and it's written in German (bugger!!). The pictures are very clear anyway so following instructions work fairly well despite me knowing only a very few words in German. I chose to make a classic Chanel style jacket and a very simple skirt. The book is from 1992, but I think jackets like this one are timeless.
As usual, I had the fabric in stash, so I did not have enough to make the whole skirt and jacket of just one fabric. Luckily, I had a little bit of left over heavy cotton/linen (mix? don't remember what the fabric was..., since I bought it a couple of years back, when making a medieval style dress!) in dark blue/purple, just enough to make facings and the skirt!
And here's some more: one left sleeve, and one right sleeve, finally. Facing, folding and putting in the lining. I am never ever doing that again with that super stiff lining, it took forever to hand sew, and I only did the sleeve endings and the bottom hem by hand. Sigh.
Here it is:
Yes, it needs ironing... I don't have an iron at the moment so all the folds and hems are a bit more fluffy than they should. Oh well.
Here are some where you can see the skirt a bit better. I used almost every little scrap of the plaid fabric, luckily, it was just enough for the waistband and the bit at the bottom. I think one good thing about having it like this is that the placement of the darker fabric makes it very slimming! The white shirt is an old rtw, I have no idea when or where I bought it (but most likely it was second hand...).
A few details, the lining, the bias cut pockets, the facing, the lovely brassy buttons with little anchors on them (I just lovelovelove them!!), and the green lining in the waistband which was also just a small scrap! Nothing gets wasted around here. :D
Now for some construction pictures...
You know you're in for a rough one when the pattern paper looks like the one above... The past weekend I remembered that I have this book called Mode Klassiker, it's a pattern book specialized on jackets, skirts and trousers... and it's written in German (bugger!!). The pictures are very clear anyway so following instructions work fairly well despite me knowing only a very few words in German. I chose to make a classic Chanel style jacket and a very simple skirt. The book is from 1992, but I think jackets like this one are timeless.
As usual, I had the fabric in stash, so I did not have enough to make the whole skirt and jacket of just one fabric. Luckily, I had a little bit of left over heavy cotton/linen (mix? don't remember what the fabric was..., since I bought it a couple of years back, when making a medieval style dress!) in dark blue/purple, just enough to make facings and the skirt!
And here's some more: one left sleeve, and one right sleeve, finally. Facing, folding and putting in the lining. I am never ever doing that again with that super stiff lining, it took forever to hand sew, and I only did the sleeve endings and the bottom hem by hand. Sigh.
Wednesday, August 31, 2011
The plaid is making me mad...
So, I'm doing the plaid thingy this week too. As usual, I can't be happy with doing something simple, so I'm making a suit (skirt and jacket). Well, it wasn't like I just decided on it on Monday, the whole plaid suit idea was already part of my autumn sewing plan. I already had the fabric, and a pattern from a pattern book I had forgotten that I had (until this Sunday...)
You may ask - what is it that is making you mad then? Well, lots of things. Learning that sewing sleeves that consists of two pieces means you actually have to think about how you put them together - otherwise you will end up with two left sleeves. Shortly after that I realized that ripping seams in loosely woven fabrics is hard. Or, at least that's how it felt until I came to hand sewing in the lining...
Now "all I have left" (famous last words...) is putting in the buttons and buttonholes in both garments, and sewing in shoulder pads on the jacket (really fun I realized I need those after sewing in the lining). Tomorrow you will see the result... I hope...!
Until then: here's some of my inspiration: Cool and a little edgy plaid, mainly by Vivienne Westwood, Alexander McQueen and Ralph Lauren!
You may ask - what is it that is making you mad then? Well, lots of things. Learning that sewing sleeves that consists of two pieces means you actually have to think about how you put them together - otherwise you will end up with two left sleeves. Shortly after that I realized that ripping seams in loosely woven fabrics is hard. Or, at least that's how it felt until I came to hand sewing in the lining...
Now "all I have left" (famous last words...) is putting in the buttons and buttonholes in both garments, and sewing in shoulder pads on the jacket (really fun I realized I need those after sewing in the lining). Tomorrow you will see the result... I hope...!
Until then: here's some of my inspiration: Cool and a little edgy plaid, mainly by Vivienne Westwood, Alexander McQueen and Ralph Lauren!
Sunday, August 28, 2011
Finished: 70's glam girl party dress!
Better late than never! Just before the week is over - and by that "That 70's Sew" over at Sew Weekly, I managed to finish my dress! (Well, actually I was done half past ten last night, but I wanted to post some good pictures for once, so therefore I waited before blogging about it... ).
Without further ado: Here is the early 70's glam girl dress! (And me all glammed up in it!)
All the pictures from the photoshoot are a bit pale, It was very bright outside today and the dress is very very shiny so it reflects the light a lot!
I went all in with big hair parted in the middle, green eye shadow, loads of bronzer on the cheeks and peachy lipgloss... And I love it, hah!
This picture is the closest to what the dress colors looks like in real life!
Keeping to my new habit I did not have a pattern for the kind of dress I wanted to make, so I went online searching for inspiration, and possible pattern envelopes to use as guidance when drafting.
I showed you my inspiration collage in a post below - here are the patterns that I looked at before I drafted my own!
I don't have any exact year on either pattern, but I read somewhere that the 2235 Vogue one was featured in the Vogue pattern book dec/jan 1969/1970, so it's right there in the beginning! My pattern is 90% drafted from the 2235 Vogue, View E, except for the sleeves which I borrowed from the 8734 Vogue. I just love that dropped waist, it feels super elegant and glamorous! I made a few more alterations, because of lack of fabric, as usual, I made the skirt just a half circle skirt instead of the full circle one that is on the original pattern.
When I drafted/cut the skirt, I realized I really didn't have enough fabric to make the skirt full length... (The fabric was only 90 cm wide.) To fix this I used the fabric scraps that were left to add a bit of length. You can see the detail here on the right. I really used every last bit of fabric, thus the big splice, and below it the smaller one! Lucky me the fabric is so busy it's even hard to see I did splice it! I am so happy I found out about my narrow hemmer foot as well, it really came in handy making that tiny hem in the end!
The fabric was one that I already had in my stash, and I have been wondering what on earth to do with it... until now, yay! I have no idea what kind of fabric it is, super shiny on the outside, and soft and cozy (almost like the inside of a sweatshirt) on the inside. Weird! Any of you who knows what it is? (I got it in a bag of different vintage fabrics, so I had no idea what I got at that time... or now.) Also - quite a difference in how the fabric colors look when inside and in close up, huh?!
Without further ado: Here is the early 70's glam girl dress! (And me all glammed up in it!)
All the pictures from the photoshoot are a bit pale, It was very bright outside today and the dress is very very shiny so it reflects the light a lot!
I went all in with big hair parted in the middle, green eye shadow, loads of bronzer on the cheeks and peachy lipgloss... And I love it, hah!
This picture is the closest to what the dress colors looks like in real life!
Keeping to my new habit I did not have a pattern for the kind of dress I wanted to make, so I went online searching for inspiration, and possible pattern envelopes to use as guidance when drafting.
I showed you my inspiration collage in a post below - here are the patterns that I looked at before I drafted my own!
I don't have any exact year on either pattern, but I read somewhere that the 2235 Vogue one was featured in the Vogue pattern book dec/jan 1969/1970, so it's right there in the beginning! My pattern is 90% drafted from the 2235 Vogue, View E, except for the sleeves which I borrowed from the 8734 Vogue. I just love that dropped waist, it feels super elegant and glamorous! I made a few more alterations, because of lack of fabric, as usual, I made the skirt just a half circle skirt instead of the full circle one that is on the original pattern.
When I drafted/cut the skirt, I realized I really didn't have enough fabric to make the skirt full length... (The fabric was only 90 cm wide.) To fix this I used the fabric scraps that were left to add a bit of length. You can see the detail here on the right. I really used every last bit of fabric, thus the big splice, and below it the smaller one! Lucky me the fabric is so busy it's even hard to see I did splice it! I am so happy I found out about my narrow hemmer foot as well, it really came in handy making that tiny hem in the end!
The fabric was one that I already had in my stash, and I have been wondering what on earth to do with it... until now, yay! I have no idea what kind of fabric it is, super shiny on the outside, and soft and cozy (almost like the inside of a sweatshirt) on the inside. Weird! Any of you who knows what it is? (I got it in a bag of different vintage fabrics, so I had no idea what I got at that time... or now.) Also - quite a difference in how the fabric colors look when inside and in close up, huh?!
Friday, August 26, 2011
Some new old(ish) patterns plus inspiration collage for my next dress!
So - I've been comfort shopping again. The other day I got some new patterns in the mail! This time I got a bunch of patterns for simpler everyday clothes, mostly from the late 80's to early 90's. I like these simple, classic patterns, some of the 80's/90's ones also have similarities to great 40's patterns, and they are perfect for making stuff to wear to work. (I don't actually have a job yet, summer has been a total pain in more ways than one, and now I have to try to either work out money issues to be able to finish up my studies this autumn or get a job. I'm trying for the latter.) In the bunch is a knitting pattern that I got as a bonus and a great underwear pattern as well! I got the whole bunch for less than 100SEK (that's about 15USD)! Yay!
I have started to use my duct tape dress form today, learning a couple of things:
*Just because I have a dress form doesn't mean draping paper patterns any more fun. I still hate that I have to change almost all commercial patterns because of those darn bazonkas.
*My personal pattern that I made to fit me, actually didn't fit me that well. (Still a lot better than the commercial ones though) I kinda already knew that since I always change it a bit once I cut the fabric and try it on a first time. Anyway now it fits!
*It is WOW so easy to draft a pattern when you can just drape the muslin over the dress form to shape the pattern pieces! I love this!
Here's what my mind is circling around right now...
Oh yes - I've seen the 70's theme over at Sew Weekly... Hopefully I'll be done with my dress before the week is over! ;)
I have started to use my duct tape dress form today, learning a couple of things:
*Just because I have a dress form doesn't mean draping paper patterns any more fun. I still hate that I have to change almost all commercial patterns because of those darn bazonkas.
*My personal pattern that I made to fit me, actually didn't fit me that well. (Still a lot better than the commercial ones though) I kinda already knew that since I always change it a bit once I cut the fabric and try it on a first time. Anyway now it fits!
*It is WOW so easy to draft a pattern when you can just drape the muslin over the dress form to shape the pattern pieces! I love this!
Here's what my mind is circling around right now...
Oh yes - I've seen the 70's theme over at Sew Weekly... Hopefully I'll be done with my dress before the week is over! ;)
Thursday, August 25, 2011
Duct tape dress form!
Today after dinner it was finally time to try to make that duct tape dress form! I've been wanting to make one for months, and finally I got around to try! Expectations were of course low, but me and my wonderful boyfriend figured it was worth a try. Without him this would so not have worked. Although he cut off my bra while getting me out. But anyway... I am lucky to have a boyfriend who really liked to make things out of paper and tape when he was a kid... So, as it turns out - my dress form became a lot better than expected!
You start with an old t-shirt and cover the rest with plastic bags.
Then it's tape time. First a whole bunch of times around the torso, then crosswise over the bust area. About three layers are enough.
The tape goes on vertically on the upper back.
Almost finished...
All done!
Oh sweet joy - about to get out. Do not do this on a warm summer day, cause it gets really warm in there...
To get out, the tape bodice is cut along the mid back from bottom up to the neck. Just to make sure we wouldn't loose any measurements I marked center front, bustline and "side seams" with masking tape before we cut.
Once I was out of the tape and before we put it back together and filled it, this is what it looked like. Sumo, anyone?
The form is filled with old newspaper and a bag of fabric scraps. It's a little lumpy here and there, but hopefully that will even out in time.
To make the dress form pin-able I put on an old dress I never use. Looks fairly good if I may say so myself!
Me and my replica! This will be very helpful for pattern drafting! Wohoo, complicated constructions, here I come!
And now for the ever so humiliating, but hilarious, pictures of the construction process!
You start with an old t-shirt and cover the rest with plastic bags.
Then it's tape time. First a whole bunch of times around the torso, then crosswise over the bust area. About three layers are enough.
The tape goes on vertically on the upper back.
Almost finished...
All done!
Oh sweet joy - about to get out. Do not do this on a warm summer day, cause it gets really warm in there...
To get out, the tape bodice is cut along the mid back from bottom up to the neck. Just to make sure we wouldn't loose any measurements I marked center front, bustline and "side seams" with masking tape before we cut.
Once I was out of the tape and before we put it back together and filled it, this is what it looked like. Sumo, anyone?
The form is filled with old newspaper and a bag of fabric scraps. It's a little lumpy here and there, but hopefully that will even out in time.
To make the dress form pin-able I put on an old dress I never use. Looks fairly good if I may say so myself!
Me and my replica! This will be very helpful for pattern drafting! Wohoo, complicated constructions, here I come!
Subscribe to:
Posts (Atom)


